
[gtranslate]
I have recently had someone reach out to me for some basic information on Dataton Watchout. I love this system. It has some fundamental differences from other video projection operating systems. This can make it a little difficult for some people to understand at first. This is especially true for non-English speakers. The colleague asking me about this speaks Azerbaijani and Russian, with English coming in maybe third. I hope that this article will translate well using normal online tools.
There are a lot of different platforms that can be used for projection installations for performance. Common systems include Isadora, PowerPoint, and QLab. These all run on a single computer, with outputs to projectors or displays.
You can create a degree of effects, fades, and movement using these. Each of these has its advantages and limitations.
- PowerPoint is simple, accessible, and easy to acquire. It does a lot if you want it to, though it requires accessories to get it to talk to more than one projector.
- QLab costs a little more; running video from QLab requires an upgrade from the more common audio-only version. It talks well to multiple projectors. It has limited effects and media controls, but is a solid platform. It is a one-computer system, so the power of your computer will limit what you can do with it. It will only run on a Mac.
- Isadora is really versatile, and can produce sophisticated effects. It is comparable to QLab in price. It is a bit of a learning curve to get used to. It runs on Windows or Mac, and can talk to multiple projectors. Like the others, the power of your computer will limit what it can do.
The system that I use most often is called Dataton Watchout. Watchout is easy to scale it up to handle as many projectors as are desired.
Watchout does not run on one computer. Watchout runs on two or more computers using a small local network with an Ethernet router. The computers talk to each other, not to the internet. There are other systems that use this principle. Watchout does more than just serve media to projectors, though. It is also a design and operating platform. It is very different than Isadora, though it has comparable artistic capabilities. When this is combined with the capacity to scale it up to handle any number of projectors, Watchout becomes a strong favorite of mine.
One computer on this local network is called the Production Computer. The other computers are Display Computers. The Display Computers are connected to the projectors and other displays.
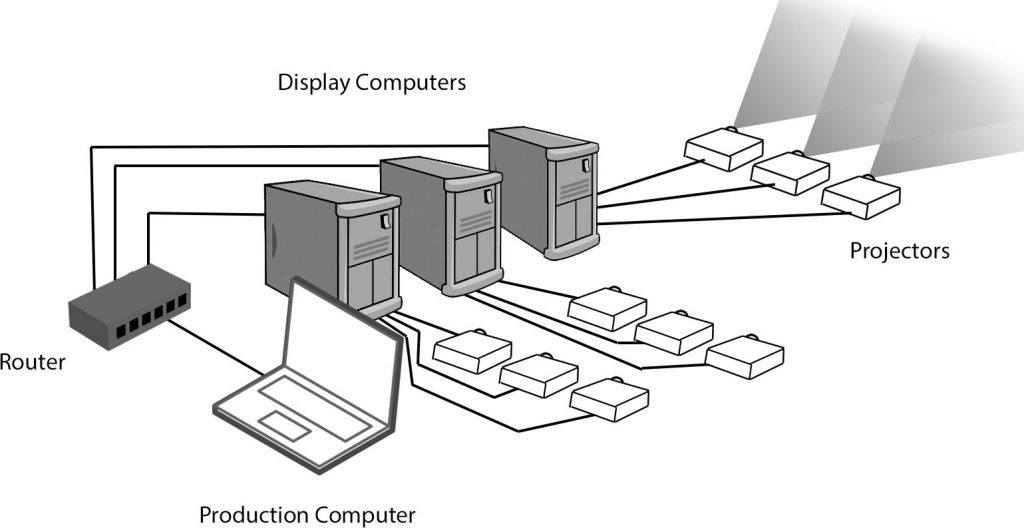
Each display is represented on the Production Computer as a colored rectangle in the Stage Window. The Stage Window shows you what your media is doing at any given moment. The media can move around and do lots of different things. Each display will show whatever activity is happening inside of its own colored rectangle.
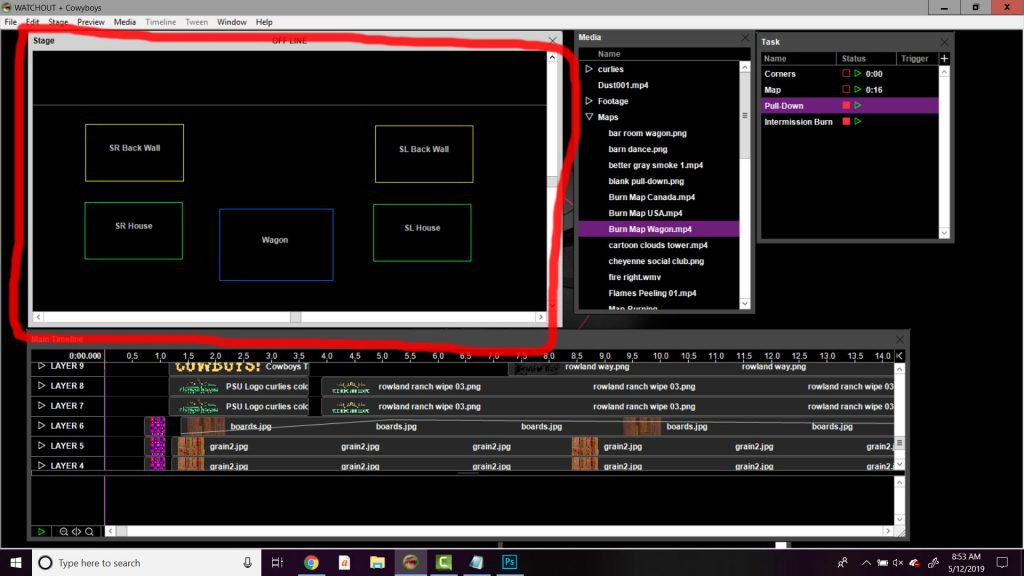
The displays will only become active when the stage is set to ONLINE mode. The stage can never be set to ONLINE mode unless there are Watchout License Keys present on the system. These are usually special USB Flash Drives provided by Dataton Watchout or one of its subsidiaries.
There are several different windows visible in this demonstration. The Stage is the big window in the top left. This is where you see what is happening in the different projectors or other displays. The large window in the bottom of the display is the timeline.
Watchout uses a timeline to generate movement and cues. Everything that happens happens in a timeline.
You can click the play button in the bottom left. You can also press the space bar. Either of these will make the timeline play.
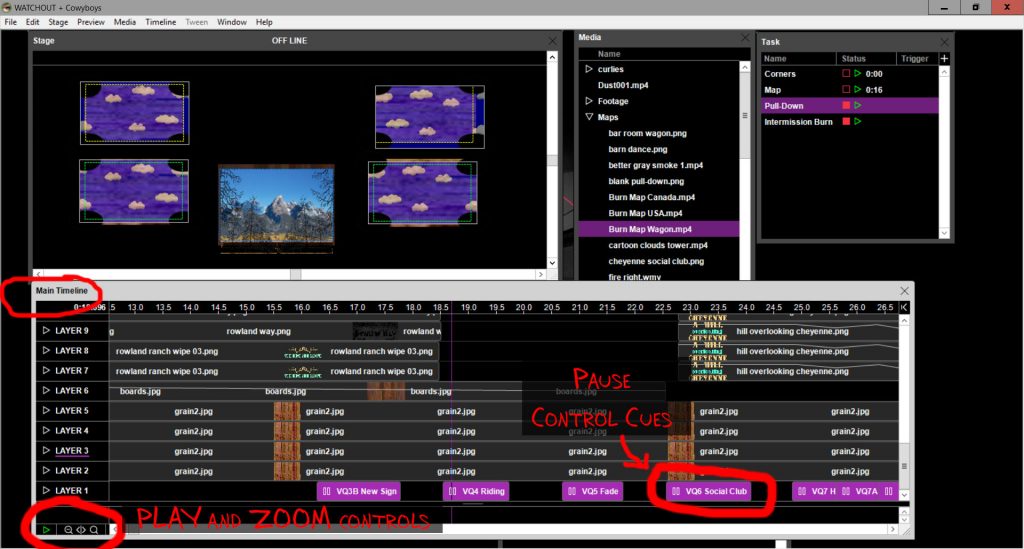
The timeline will run until it encouters a “Pause Control Cue.” A Pause Control Cue will make the timeline stop. It will not start again unless someone clicks Play or the Space Bar again. This is how you create cues. You allow the timeline to run, and it pauses when it encounters a pause control cue.
There is another kind of control cue you can add. This is called a “Play Control Cue.” A Play Control Cue does not pause the timeline. Instead, it can do one of two things: It can jump to a different part of the main timeline. It can also start or stop an “Auxilary Timeline.” An Auxilary Timeline is simply an extra timeline that runs media in the foreground in front of the Main Timeline. Auxilary timelines are a good way to build a complicated sequence that you might want to run over and over again. Instead of putting it in the main timeline over and over, you build it once, and activate it whenever you need it using a Play Control Cue.

You can use almost any kind of still image or video clip in Watchout. You have to tell Watchout where the files are stored on your computer. You do this by adding media files to the Media Window. Watchout will store the file path of the media in this list. You can organize your media files however you like in this window. You must leave the media exactly where you originally told Watchout it could be found.
Once you have the media listed in the Media Window, you can drag the media from the Media Window into the Timeline. The timeline works like a video editor. Wherever the media starts and stops, it will become visible.
You can animate your media using the “Tween” menu. You do this by assigning KEY POINTS to the media.
You can assign OPACITY to a still image. You tell Watchout that the media has an opacity of 100%. This means that it is completely visible. You then add a second opacity key five seconds later. This one has an opacity of 0%. The still image will now fade and disappear over the course of five seconds.
You can assign movement to a still image. You tell Watchout where the image is located using POSITION. You then go to another point on the timeline, and assign another POSITION key. While that key is highlighted, move the image to a different place in the STAGE window. As the timeline plays, it will move the image from one point to the other.
There are many different qualities that can be controlled using the TWEEN menu. These include position, scale, crop, corners, opacity, rotation, chroma-key, and many more. All of these can change quickly or slowly on the timeline by adding key points.
Video clips do not have to run in real-time on the timeline. There are two settings that come in really handy. These are free-running and looping. When a video clip is free-running, it will continue to run even if the timeline hits a pause cue. If a video is looping, it will continue to play indefinitely. For example, you can create a looping video of fire and place it someplace. It will run, looping, indefinitely. While it is running, you can treat it like a still image. It can fade in and out, or move from here to there. It can grow or shrink, or temporarily acquire chroma key properties. The same would be true for clouds moving across the sky, or flowing water, or countless other useful things.
Dataton has their own library of tutorials for their software here:
https://vimeo.com/channels/watchout/129773549